ESP32-CAM sensor configuration
Tired of juggling obscure ESP-IDF calls just to get the ESP32-CAM sensor to behave? This tutorial shows how to configure every aspect of the ESP32-CAM using a clear fluent interface so you can chain settings naturally instead of hunting through documentation. By exposing descriptive methods that map to sensor features, the approach leverages Arduino IDE autocomplete to speed up development and reduce errors. You will stop guessing parameter names and instead select options from suggestions, making setup faster and more reliable.
ESPx library
This project makes use of the espx library.
This library for Arduino defines a set of abstractions that make the ESP32 features easily accessible with
few lines of code. Some of the features are:
- WiFi connection (
wifix) - HTTP client (
httpx) - Multithreading (
threadx) - Camera manipulation (
camx)
Installation
Install the latest version of espx from the Arduino Library Manager.
The code examples on this page have been tested with version 1.0.2: if you get weird
errors about missing variables or method, double check that you have the correct version.
If the error persists, please open an issue on GitHub.
The ugly way of configuring the ESP32-CAM sensor
If you've ever configured the ESP32-CAM sensor before to tweak its values, the following code should look familiar.
// increase brightness
sensor->set_brightness(sensor, 1);
// flip vertically
sensor->set_vflip(sensor, 1);
// set exposure manually
// did you know exposure ranges from 0 to 1200?
// also, would you guess that "aec" regulates exposure?
sensor->set_aec_value(sensor, 800);
// increase brightness
sensor->set_brightness(sensor, 1);
// flip vertically
sensor->set_vflip(sensor, 1);
// set exposure manually
// did you know exposure ranges from 0 to 1200?
// also, would you guess that "aec" regulates exposure?
sensor->set_aec_value(sensor, 800);
The above code works perfectly: the ugly part is that you would need to have the ESP-IDF docs on the side to double check what is the proper method name for the setting you want to change and, optionally, the range the function accepts.
The ESPx way
As part of the espx library, you have access to a camx object (see ESP32-CAM: take first picture for a quickstart on how to use it). The camx object has a sensor attribute that gives you a fluent, consistent interface to all those configurations using natural language.
// flip horizontally
camx.sensor.flipHor();
// flip vertically
camx.sensor.flipVert();
// increase saturation
camx.sensor.saturation(Intensity::high);
// decrease brightness
camx.sensor.brightness(Intensity::low);
// flip horizontally
camx.sensor.flipHor();
// flip vertically
camx.sensor.flipVert();
// increase saturation
camx.sensor.saturation(Intensity::high);
// decrease brightness
camx.sensor.brightness(Intensity::low);
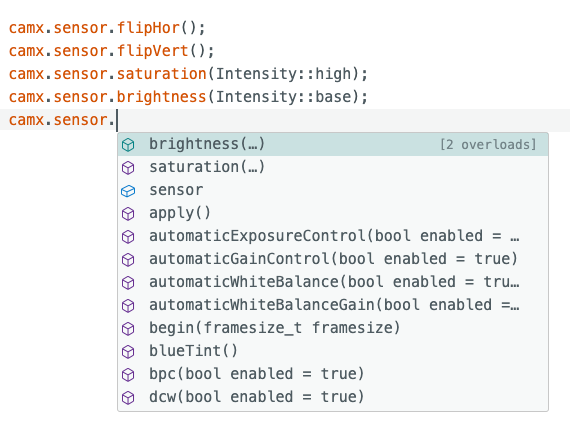
Much nicer, right? And the best part is that you can leverage the Arduino IDE autocomplete feature to list all the available, easy understandable, methods.

Complete sketch
The following sketch configures the sensor and boots a MJPEG server to check the results from the live stream (see ESP32-CAM streaming server for more details).
/**
 * Configure sensor.
 * Boot the MJPEG server to visually inspect tha changes.
 */
#include <espx.h>
#include <espx/wifix.h>
#include <espx/mdnsx.h>
#include <espx/camx.h>
#include <espx/camx/mjpegx.h>


void setup() {
    delay(1000);
    Serial.begin(115200);
    Serial.println("Camx example: sensor config");

    // configure camx through Serial Monitor
    camx.model.prompt();
    camx.pixformat.jpeg();
    camx.quality.high();
    camx.resolution.qvga();
    camx.begin().raise();

    // configure sensor AFTER camera init!
    // (use IDE autocomplete suggestions to explore all options)
    camx.sensor.flipHor();
    camx.sensor.flipVert();
    camx.sensor.saturation(Intensity::high);
    camx.sensor.brightness(Intensity::base);
    // always remember to apply() the settings!
    camx.sensor.apply();

    // start mjpeg server
    wifix("SSID", "PASSWORD").raise();
    mdnsx("esp32cam");
    mjpegx.listenOn(80);
    mjpegx.begin().raise();
}


void loop() {
  // server runs in background
}